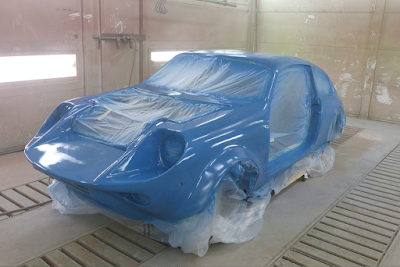
So... I spent much of December in dust (click here). But after that it was time for some actual painting. Joost and I drove over to Ghent in Belgium one afternoon where we had primer mixed in colour by a real paint guru. The only original paint left was (and still is) to be found behind the car’s door locks, which is excellently conserved and thus perfect for colour matching.
Christmas came and was spent back home and after Boxing Day I drove over to the spray booth again (eventually clocking up over 2,500 kms in a week’s time). All the holes and open spaces on the smoothed shell were now covered with adhesive tape in order to protect them against spray mist and Joost took the spray gun. It was like magic to see the car’s rather messy patchwork outfit change into one smooth suit of blue. Pretty much how it will look like when the actual paint is applied. It wasn’t for long though. Joost taught me to fill in all the tiny little pinholes with filler and sand these down first before applying spray filler. So that’s what we did the next day. Three layers of spray filler were applied to the shell next and that’s the condition it is in right now. The advice is to wait for some six months to have the layers harden out and then we’ll have to lock ourselves in for another week or so, and sand most away once again. I look forwards to it already!
Christmas came and was spent back home and after Boxing Day I drove over to the spray booth again (eventually clocking up over 2,500 kms in a week’s time). All the holes and open spaces on the smoothed shell were now covered with adhesive tape in order to protect them against spray mist and Joost took the spray gun. It was like magic to see the car’s rather messy patchwork outfit change into one smooth suit of blue. Pretty much how it will look like when the actual paint is applied. It wasn’t for long though. Joost taught me to fill in all the tiny little pinholes with filler and sand these down first before applying spray filler. So that’s what we did the next day. Three layers of spray filler were applied to the shell next and that’s the condition it is in right now. The advice is to wait for some six months to have the layers harden out and then we’ll have to lock ourselves in for another week or so, and sand most away once again. I look forwards to it already!
Fully prepared for primer and all masked up. The Le mans Mini Marcos reaches its next stage
Picture Jeroen Booij
To prepare it we had locked ourselves up with filler and sand paper for a week first
Picture Jeroen Booij
We had the colour for primer matched from the original blue, which is still hidden behind the car's door locks (note: actual colour is quite different from the hue on the picture)
Picture Jeroen Booij
And there we go! A fresh coat of primer being applied over the patchwork
Picture Jeroen Booij
It was like magic to see the car turn into one colour once again. Joost is at the spray gun
Picture Jeroen Booij
And blue once more! Not for long though, as this is just a coat of primer
Picture Jeroen Booij
Rear wheel arches received the same treatment after having been made to fit the body
Picture Jeroen Booij
Next step: filling all the tiny little pinholes with filler. Hundreds of them!
Picture Jeroen Booij
And sanding them out once more... Joost is degreasing the roof here
Picture Jeroen Booij
Rear wheel arches needed some serious filling as well...
Picture Jeroen Booij
Bye-bye blue, this is the first coat of spray filler applied over the blue primer
Picture Jeroen Booij
And another one in a different hue to make things easier when we sand the whole body once more
Picture Jeroen Booij
And a third and final coat of spray filler, again in another hue to differentiate them
Picture Jeroen Booij
A happy spray painter! Joost applied some ultra-thinned blue paint 'to get it into its pores'
Picture Jeroen Booij
And ready to go back home again. Six long months of drying is the recipe now...
Picture Jeroen Booij


No comments:
Post a Comment